프로젝트 생성 - STS 4.x 세팅
1. 개발 툴 설치
1.1 STS 4.x 설치 : https://spring.io/tools
Spring | Home
Cloud Your code, any cloud—we’ve got you covered. Connect and scale your services, whatever your platform.
spring.io
1.2 H2 DB 설치 : https://www.h2database.com/html/download-archive.html
• 버전은 1.4.199 ZIP으로 다운로드
Archive Downloads
www.h2database.com
- H2 실행
zip파일 압축 해제 > h2경로의 bin 폴더 접근 > h2w.bat실행 > 브라우저에 창이 뜸 > localhost:8082로 입력
Generic H2 (Server) 선택 > JDBC URL에 jpa_study로 설정 > C:\Users\xxxxx에 jpa_study.mv.db명으로 빈 파일명 입력 > 연결 버튼 클릭

2. 프로젝트 세팅
2.1 신규 프로젝트 생성
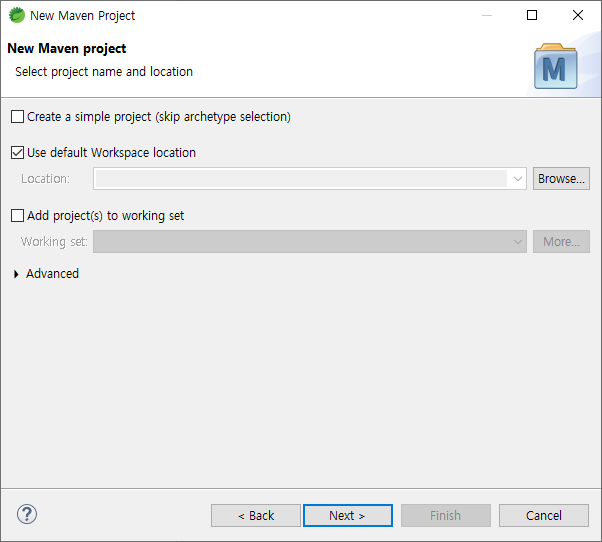
• create a project 클릭 > Maven Project 선택 > Next 클릭

2.2 location 선택
• Next 클릭

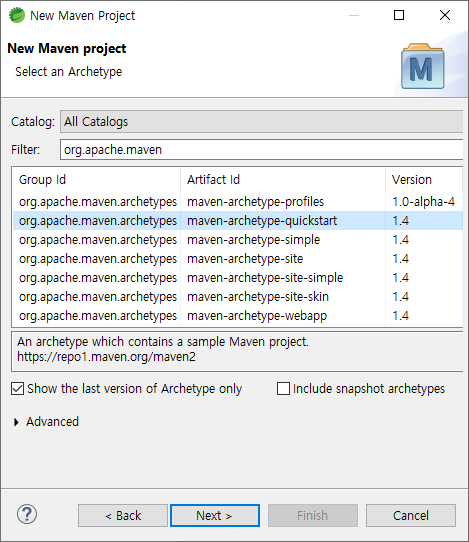
2.3 maven 기본 틀 선택
• Filter에 org.apache.maven 검색 > artifact Id : maven-archetype-quickstart 선택 > next 클릭

2.4 프로젝트 세팅
• 내용 작성 > Finish 클릭

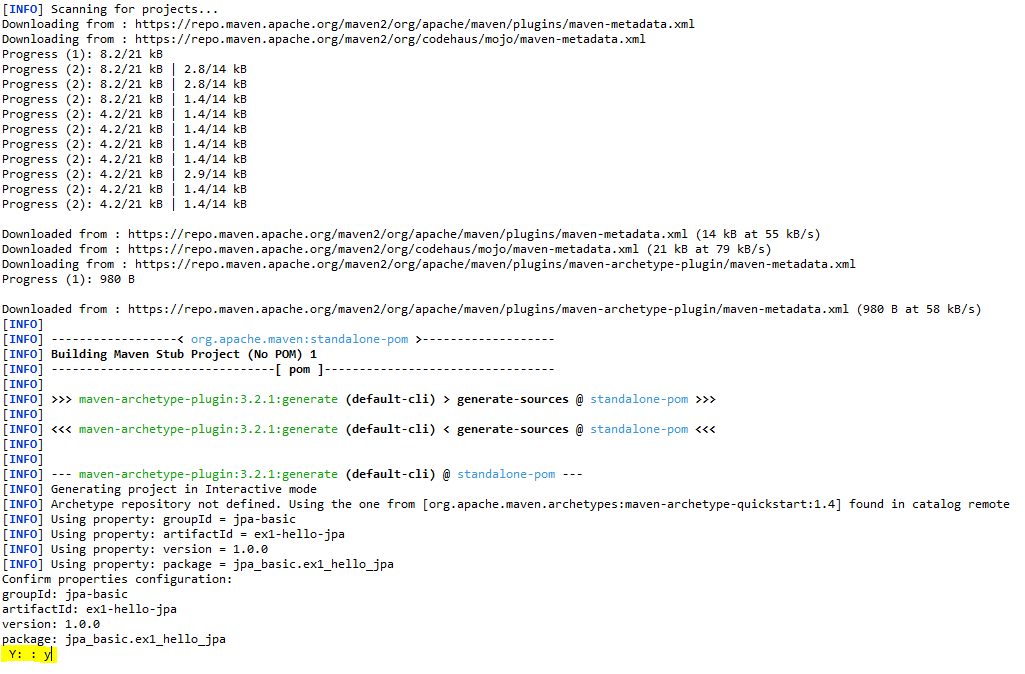
2.5 콘솔창에서 y 입력 후 엔터

2.6 maven 디팬던시 추가
• workspace\ex1-hello-jpa\pom.xml 열기
• 컴파일러 버전 수정 및 dependency 추가

javax.xml.bind 추가 이유 : JAVA11에서 에러 발생
• plugin 추가

org.apache.maven.plugins 추가 이유 : JAVA11에서 에러 발생
※ pom.xml 전체 소스
<?xml version="1.0" encoding="UTF-8"?>

<project xmlns="http://maven.apache.org/POM/4.0.0" xmlns:xsi="http://www.w3.org/2001/XMLSchema-instance"
  xsi:schemaLocation="http://maven.apache.org/POM/4.0.0 http://maven.apache.org/xsd/maven-4.0.0.xsd">
  <modelVersion>4.0.0</modelVersion>

  <groupId>jpa-basic</groupId>
  <artifactId>ex1-hello-jpa</artifactId>
  <version>1.0.0</version>

  <name>ex1-hello-jpa</name>
  <!-- FIXME change it to the project's website -->
  <url>http://www.example.com</url>

  <properties>
    <project.build.sourceEncoding>UTF-8</project.build.sourceEncoding>
    <maven.compiler.source>1.8</maven.compiler.source>
    <maven.compiler.target>1.8</maven.compiler.target>
  </properties>

  <dependencies>
	<dependency>
		<groupId>javax.xml.bind</groupId>
		<artifactId>jaxb-api</artifactId>
		<version>2.3.0</version>
	</dependency>
	<!-- JPA 하이버네이트 -->
	<dependency>
		<groupId>org.hibernate</groupId>
		<artifactId>hibernate-entitymanager</artifactId>
		<version>5.3.10.Final</version>
	</dependency>
	<!-- H2 데이터베이스 -->
	<dependency>
		<groupId>com.h2database</groupId>
		<artifactId>h2</artifactId>
		<version>1.4.199</version>
	</dependency>
    <dependency>
      <groupId>junit</groupId>
      <artifactId>junit</artifactId>
      <version>4.11</version>
      <scope>test</scope>
    </dependency>
  </dependencies>

  <build>
    <pluginManagement><!-- lock down plugins versions to avoid using Maven defaults (may be moved to parent pom) -->
      <plugins>
        <plugin>
          <groupId>org.apache.maven.plugins</groupId>
          <artifactId>maven-compiler-plugin</artifactId>
          <configuration>
            <source>8</source>
            <target>8</target>
          </configuration>
        </plugin>

        <!-- clean lifecycle, see https://maven.apache.org/ref/current/maven-core/lifecycles.html#clean_Lifecycle -->
        <plugin>
          <artifactId>maven-clean-plugin</artifactId>
          <version>3.1.0</version>
        </plugin>
        <!-- default lifecycle, jar packaging: see https://maven.apache.org/ref/current/maven-core/default-bindings.html#Plugin_bindings_for_jar_packaging -->
        <plugin>
          <artifactId>maven-resources-plugin</artifactId>
          <version>3.0.2</version>
        </plugin>
        <plugin>
          <artifactId>maven-compiler-plugin</artifactId>
          <version>3.8.0</version>
        </plugin>
        <plugin>
          <artifactId>maven-surefire-plugin</artifactId>
          <version>2.22.1</version>
        </plugin>
        <plugin>
          <artifactId>maven-jar-plugin</artifactId>
          <version>3.0.2</version>
        </plugin>
        <plugin>
          <artifactId>maven-install-plugin</artifactId>
          <version>2.5.2</version>
        </plugin>
        <plugin>
          <artifactId>maven-deploy-plugin</artifactId>
          <version>2.8.2</version>
        </plugin>
        <!-- site lifecycle, see https://maven.apache.org/ref/current/maven-core/lifecycles.html#site_Lifecycle -->
        <plugin>
          <artifactId>maven-site-plugin</artifactId>
          <version>3.7.1</version>
        </plugin>
        <plugin>
          <artifactId>maven-project-info-reports-plugin</artifactId>
          <version>3.0.0</version>
        </plugin>
      </plugins>
    </pluginManagement>
  </build>
</project>
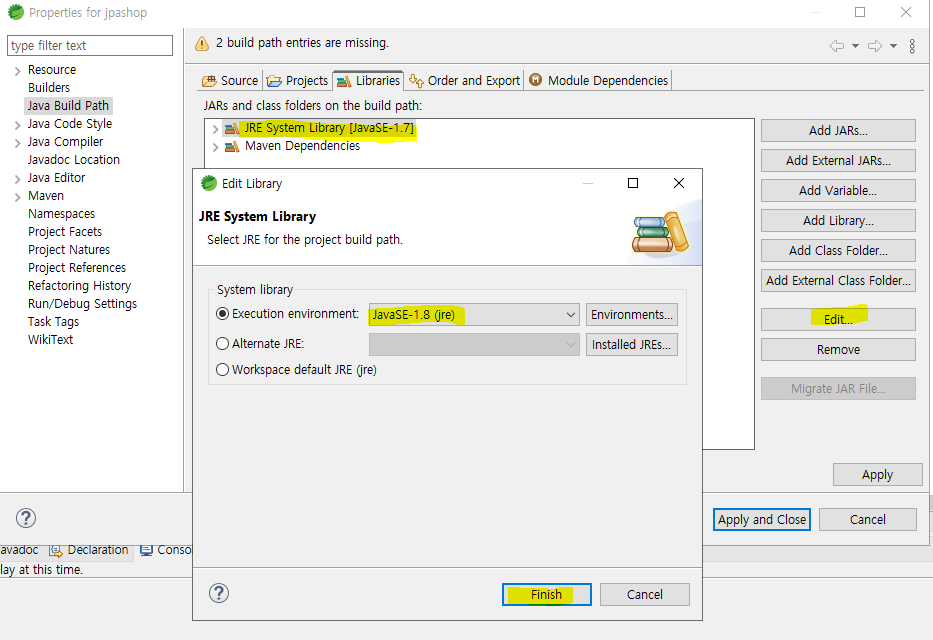
2.7 프로젝트 1.8로 세팅
• 프로젝트 우클릭 > properties 클릭 > Java Bulid Path 선택 > JRE System Library [JavaSE-1.7] 선택 > Edit 선택 > JavaSE-1.8(jre) 변경 후 Finish

2.8 JPA 세팅 정보 설정
• src/main/java 우클릭 > New > Package 클릭 > source folder에 java 삭제 후 name에 resources 입력 > Finish 클릭

• src/main/resources 우클릭 > New > Folder 클릭 > Folder name에 META-INF 입력 > Finish 클릭

• workspace\ex1-hello-jpa\src\main\resources\META-INF\persistence.xml 파일 생성
<?xml version="1.0" encoding="UTF-8"?>
<persistence version="2.2"
	xmlns="http://xmlns.jcp.org/xml/ns/persistence" xmlns:xsi="http://www.w3.org/2001/XMLSchema-instance"
	xsi:schemaLocation="http://xmlns.jcp.org/xml/ns/persistence http://xmlns.jcp.org/xml/ns/persistence/persistence_2_2.xsd">
	<persistence-unit name="hello">
		<properties>
			<!-- 필수 속성 -->
			<property name="javax.persistence.jdbc.driver" value="org.h2.Driver" />
			<property name="javax.persistence.jdbc.user" value="sa" />
			<property name="javax.persistence.jdbc.password" value="" />
			<property name="javax.persistence.jdbc.url" value="jdbc:h2:tcp://localhost/~/jpa_study" />
			<property name="hibernate.dialect" value="org.hibernate.dialect.H2Dialect" />

			<!-- 옵션 -->
			<property name="hibernate.show_sql" value="true" />
			<property name="hibernate.format_sql" value="true" />
			<property name="hibernate.use_sql_comments" value="true" />
			<!-- <property name="hibernate.hbm2ddl.auto" value="create" />-->
		</properties>
	</persistence-unit>
</persistence>
3. 실행 테스트
• App.java에 테스트 코드 작성
package jpa_basic.ex1_hello_jpa;

import javax.persistence.EntityManager;
import javax.persistence.EntityManagerFactory;
import javax.persistence.Persistence;

public class App {
	public static void main(String[] args) {
		EntityManagerFactory emf = Persistence.createEntityManagerFactory("hello");

		EntityManager em = emf.createEntityManager();

		em.close();
		emf.close();
	}
}
• 실행
- App.java 우클릭 > Run > Java Application 클릭
- 로그

'일상의 흔적 > Study' 카테고리의 다른 글
| 면접 SPRING 질문 - 2 (0) | 2023.03.22 |
|---|---|
| 면접 Java 질문 - 1 (0) | 2023.03.22 |
| 자바 ORM표준 JPA 프로그래밍 (기본편) : JPA소개 - 1 (0) | 2023.03.22 |
| 생활코딩 OAuth2.0 (0) | 2023.03.21 |
| 인프런 스프링 MVC 2 (백엔드 웹개발 활용 기술) : 로그인처리2 필터, 인터셉터 - 7 (0) | 2023.03.21 |